
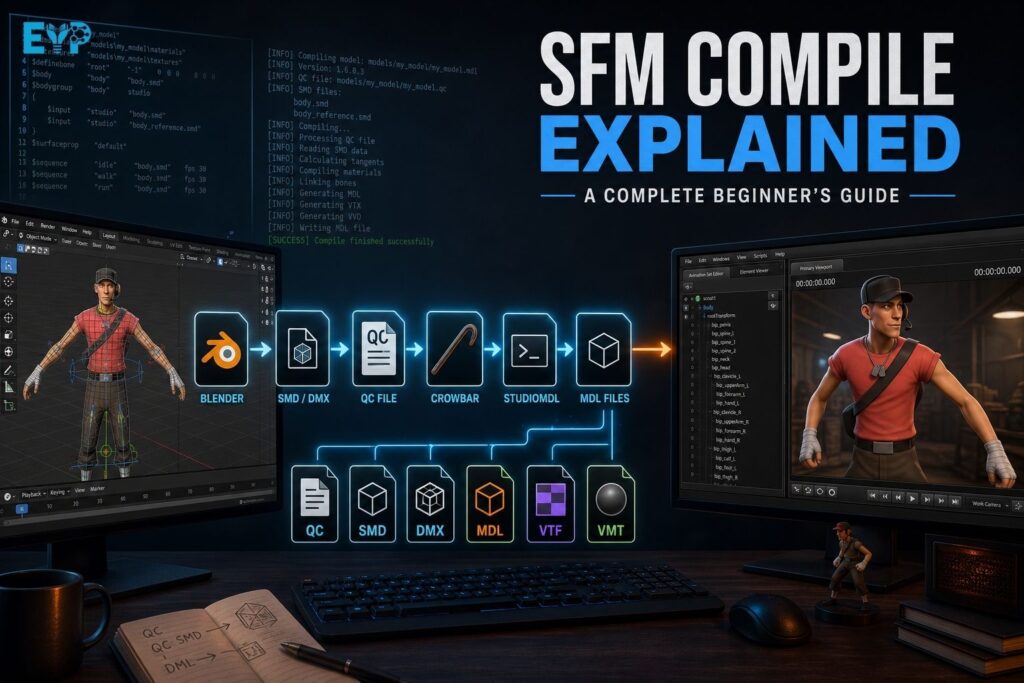
If you’ve ever downloaded a custom model for Source Filmmaker (SFM) only to see missing textures, an invisible character, or the infamous pink-and-black checkerboard pattern, you’ve already encountered the importance of SFM compile. Although the word “compile” sounds technical, the idea behind it is surprisingly straightforward. It’s simply the process of converting raw 3D assets into a format that the Source Engine understands.
For many beginners, this stage feels intimidating because it involves several files, tools, and unfamiliar terms like QC, SMD, DMX, and MDL. The good news is that once you understand how these pieces fit together, compiling becomes much less mysterious. Instead of guessing why something broke, you’ll know where to look and how to fix it.
This guide walks through the entire SFM compile workflow in plain English. You’ll learn what compiling actually does, why it’s necessary, which tools professionals use, and how the complete asset pipeline works from Blender to Source Filmmaker.
What Is SFM Compile?
A Simple Definition for Beginners
At its core, SFM compile is the process of converting source files into optimized Source Engine assets. Programs like Blender create models in formats such as FBX, OBJ, or project files that contain far more information than the Source Engine needs. Before Source Filmmaker can recognize those assets, they must be transformed into native files like MDL, VVD, and VTX.
Think of it like translating a document into another language. The original model might look perfect inside Blender, yet SFM can’t understand it until it’s converted into its own language. That’s exactly what the compilation process accomplishes.
Unlike rendering, which creates a finished image or video, compiling prepares assets so the engine can display, animate, and simulate them in real time. Without this conversion step, the model simply won’t load correctly.
What Gets Compiled?
Many newcomers assume only the 3D model itself goes through compilation. In reality, several different components work together during the build process.
A typical model compilation includes:
- The model’s mesh or geometry
- The skeleton and bone hierarchy
- Animation data
- Material references
- Collision models
- Physics information when needed
- Body groups and additional model variations
Each of these elements helps the Source Engine understand how the asset should behave. If even one part references the wrong file or folder, the compile may fail or produce unexpected results.
Why Compiling Matters
The Source Engine wasn’t designed to read modern modeling formats directly. Instead, Valve created its own optimized asset system to improve real-time rendering, animation playback, and game performance.
During compilation, unnecessary information gets removed while essential data is reorganized into efficient engine-specific files. This optimization helps SFM display complex scenes smoothly without constantly converting assets in the background.
That’s why compiling isn’t just another step in the workflow. It’s the bridge between your modeling software and the engine itself.
How the Source Filmmaker Asset Pipeline Works
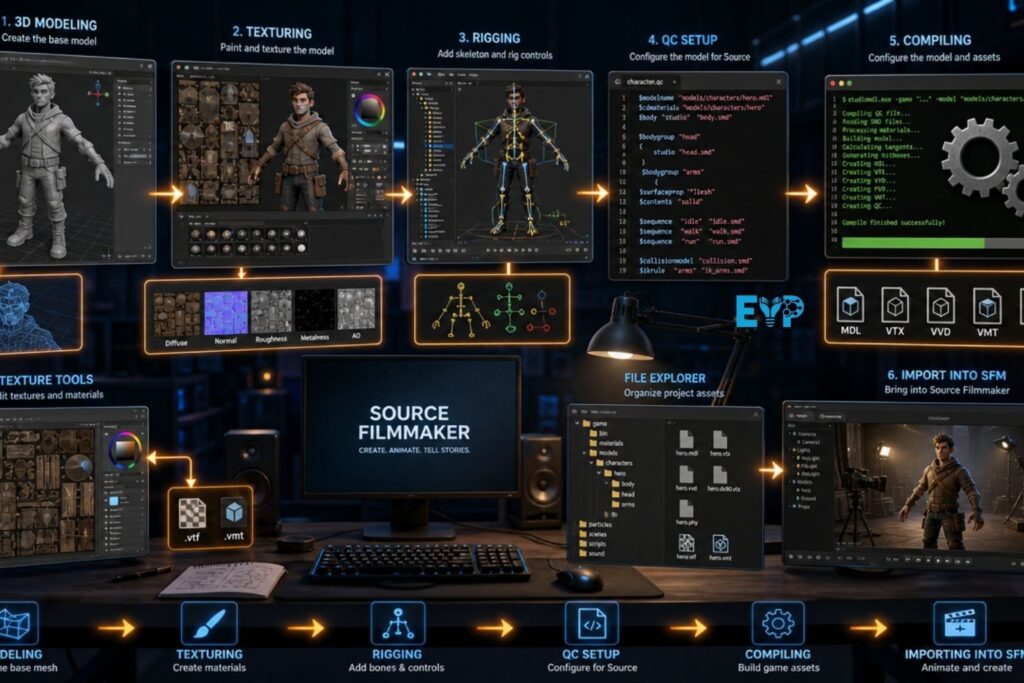
Before pressing the Compile button, it’s helpful to understand the complete asset pipeline. Every successful project follows roughly the same path, whether you’re creating a custom character, a weapon, or an environment prop.
Once you understand this workflow, troubleshooting becomes much easier because you’ll know exactly where a problem originated.
From 3D Software to SFM
Most creators begin inside Blender, although some still use 3ds Max or Maya. Here they build the model, create materials, rig the skeleton, and prepare animations.
After the asset is complete, it gets exported into an intermediate format such as SMD or DMX. These formats preserve the mesh, bones, animations, and other information needed by the compiler.
Next comes the QC file, which acts like a set of instructions. Instead of containing the model itself, it tells the compiler where files are located, which materials to use, how animations should play, and where the final output belongs.
Only then does studiomdl.exe, usually launched through Crowbar, generate the finished Source Engine files.
The Complete Compile Pipeline
3D Modeling (Blender)
          │
          ▼
Export to SMD or DMX
          │
          ▼
Create/Edit QC File
          │
          ▼
Crowbar launches StudioMDL
          │
          ▼
Compilation Process
          │
          ▼
Generate MDL, VVD, VTX, PHY
          │
          ▼
Copy Assets to Source Filmmaker
          │
          ▼
Load and Test Inside SFM
Although the pipeline contains several steps, each one has a clear purpose. Skipping one almost always leads to errors later.
What Happens During Compilation?
A lot more occurs behind the scenes than most beginners realize.
The compiler first checks whether every referenced file exists. It verifies the bone structure, confirms the mesh data, validates material references, and ensures that animation sequences match the skeleton.
Once everything passes validation, studiomdl converts those source assets into optimized engine files. During this stage, it also generates compiler logs, which record warnings, errors, and useful debugging information.
Those logs become incredibly valuable when something doesn’t work as expected. Instead of blindly changing settings, you can often pinpoint the exact issue within seconds.
File Types Used During an SFM Compile
One reason beginners find Source Filmmaker compile confusing is the number of unfamiliar file extensions. Fortunately, each file serves a specific purpose. Once you recognize what each one does, the workflow becomes much easier to understand.
QC Files
The QC file is often described as the blueprint of the compilation process. It doesn’t contain the model itself. Instead, it provides instructions that guide studiomdl through the entire build.
Inside a QC file, you’ll find commands that define:
- Model names
- Material directories
- Animation sequences
- Collision models
- Physics settings
- Body groups
- Output locations
Without a properly written QC script, the compiler has no idea how to assemble your project.
Because it’s a plain text document, many artists edit it using Notepad++, which offers syntax highlighting and makes mistakes easier to spot.
SMD Files
SMD stands for Studio Model Data. For many years, it has been one of the standard formats used throughout the Source Engine ecosystem.
An SMD file can store:
- Mesh information
- Skeleton hierarchy
- Bone weights
- Animation sequences
Although newer workflows increasingly rely on DMX, plenty of existing projects still use SMD because it’s simple, reliable, and widely supported.
DMX Files
DMX is a newer asset format introduced by Valve to overcome some limitations of SMD.
Compared to SMD, DMX supports more advanced animation data, richer metadata, and additional features that modern workflows often require. Many artists using updated Blender Source Tools prefer exporting directly to DMX whenever possible.
If your project doesn’t require advanced functionality, SMD remains perfectly acceptable. Both formats appear regularly throughout the Source Filmmaker workflow.
MDL and Related Output Files
Compilation doesn’t produce just one file. Instead, the Source Engine creates several files that work together.
| File | Purpose |
|---|---|
| MDL | Main compiled model |
| VVD | Vertex information |
| VTX | Optimized rendering data |
| PHY | Physics and collision data (optional) |
| ANI | Animation information for certain models |
Deleting one of these files can prevent a model from loading correctly even if the others remain intact.
Tools Required for SFM Compile
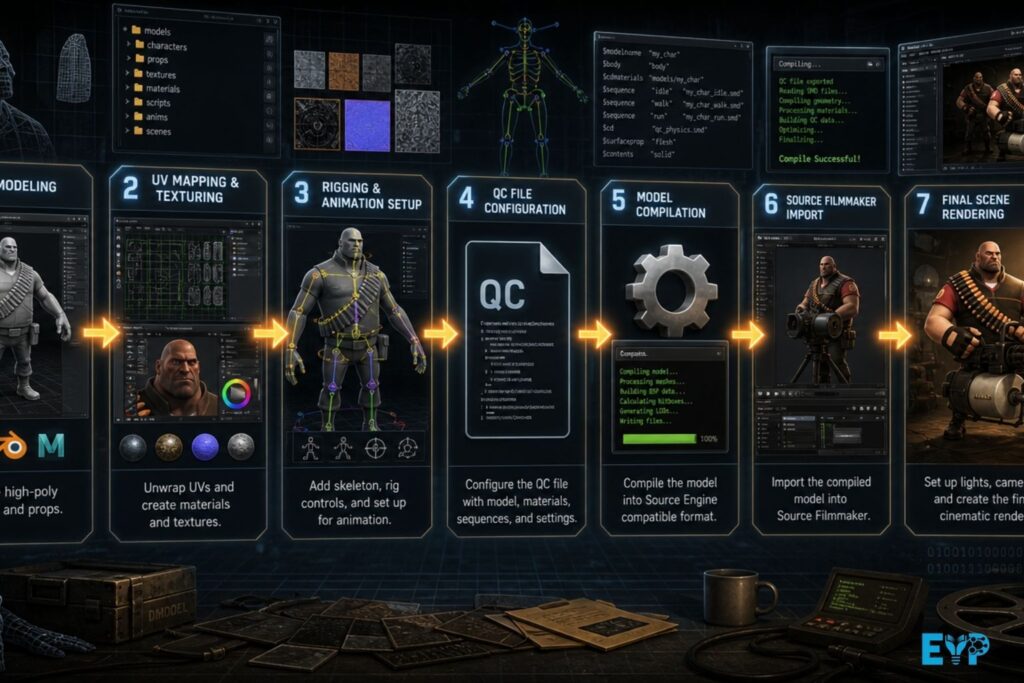
The good news is that you don’t need dozens of applications. Most creators rely on a small collection of trusted tools that have become community standards over the years.
Each one handles a different part of the animation asset pipeline.
Crowbar
Ask experienced Source modders which tool they recommend first, and Crowbar almost always comes up.
Crowbar provides a friendly graphical interface for studiomdl.exe, eliminating the need to memorize complicated command-line instructions. It allows you to compile, decompile, inspect models, and quickly review compiler output from one place.
For beginners, this dramatically lowers the learning curve while still providing access to the full power of Valve’s compiler.
StudioMDL
Although Crowbar receives most of the attention, the real work happens inside studiomdl.exe.
This official compiler, developed by Valve, reads the QC script, processes exported assets, validates references, and generates the native Source Engine model files.
Whenever someone mentions “compiling an SFM model,” StudioMDL is almost always the software performing the actual conversion behind the scenes.
Blender Source Tools
If you build models inside Blender, you’ll almost certainly use Blender Source Tools.
This export plugin helps artists generate compatible SMD export and DMX export files while preserving important information such as the skeleton hierarchy, animation data, and material references.
Correct export settings save hours of troubleshooting later. Many common compile failures begin with incorrect export options rather than problems inside the compiler itself.
VTFEdit
Textures also require preparation before the Source Engine can use them.
Programs like VTFEdit convert standard image formats into VTF textures, while accompanying VMT materials define how those textures behave inside the engine. Material properties such as transparency, reflections, bump maps, and shaders all depend on properly configured VMT files.
When textures appear as purple-and-black or pink-and-black checkerboards, the issue usually involves missing or incorrectly referenced VTF or VMT files.
Optional Utilities
Several additional utilities can make your workflow smoother, especially on larger projects.
Some of the most useful include:
- Notepad++ for editing QC scripts.
- Noesis for inspecting model files.
- Wall Worm for creators using 3ds Max.
- Version control software for backing up project folders.
- File comparison tools for debugging configuration changes.
None of these tools are mandatory. However, they can save time as your projects become more complex.
Step-by-Step SFM Compile Process
Compiling a model isn’t about clicking a single button. It’s a structured workflow where each step prepares the next one. When you follow the process in order, you’ll spend less time chasing obscure errors and more time creating animations.
The biggest mistake beginners make is skipping validation. A model that looks perfect in Blender can still fail inside Source Filmmaker if file paths, skeletons, or materials aren’t prepared correctly.
Step 1: Prepare the Model
Before exporting anything, inspect your model carefully. Make sure the mesh, rig, and bone hierarchy are clean. Remove duplicate geometry, unused materials, and unnecessary objects that won’t appear in the final project.
It’s also worth checking transforms. Applying location, rotation, and scale before export helps prevent scale mismatch, distorted animations, and misplaced props later in the pipeline.
Step 2: Export the Mesh
Once the model is ready, export it using Blender Source Tools. Depending on your workflow, you’ll usually create an SMD or DMX file.
If you’re exporting animations, make sure each sequence references the correct skeleton. A mismatched skeletal rig is one of the fastest ways to trigger compilation errors.
Step 3: Create or Edit the QC File
The QC file tells studiomdl exactly how to build your asset. It references the exported files, specifies material directories, defines animations, and determines the final model name.
Treat the QC file like a recipe. If one instruction points to the wrong location or uses the wrong filename, the compiler won’t know how to complete the build.
Step 4: Configure Crowbar
Open Crowbar, select your QC file, and verify the path to studiomdl.exe. Double-check both your input and output directories before starting the compile.
A surprising number of failed builds happen because files are being written to the wrong project folder.
Step 5: Run the Compile
After everything is configured, begin the compilation.
Watch the compiler logs as the process runs. Even when the compile succeeds, warnings can reveal hidden issues that might cause problems once the model is imported into SFM.
Step 6: Verify the Generated Files
A successful compile usually produces several files rather than a single model.
Confirm that the expected MDL, VVD, VTX, and any required PHY files were created. Missing output often indicates that the compile stopped before completion.
Step 7: Move Files into the Correct SFM Directory
Place the compiled assets into the correct Source Filmmaker game directory while preserving the folder hierarchy defined in the QC file.
Moving only the MDL file without its supporting files usually results in loading failures.
Step 8: Test the Model Inside Source Filmmaker
Finally, launch SFM and load the model.
Rotate it in the viewport, apply animations, test materials, and verify that physics, body groups, and textures behave as expected. Small problems are much easier to fix immediately than after hours of animation work.
Understanding the QC File in Detail
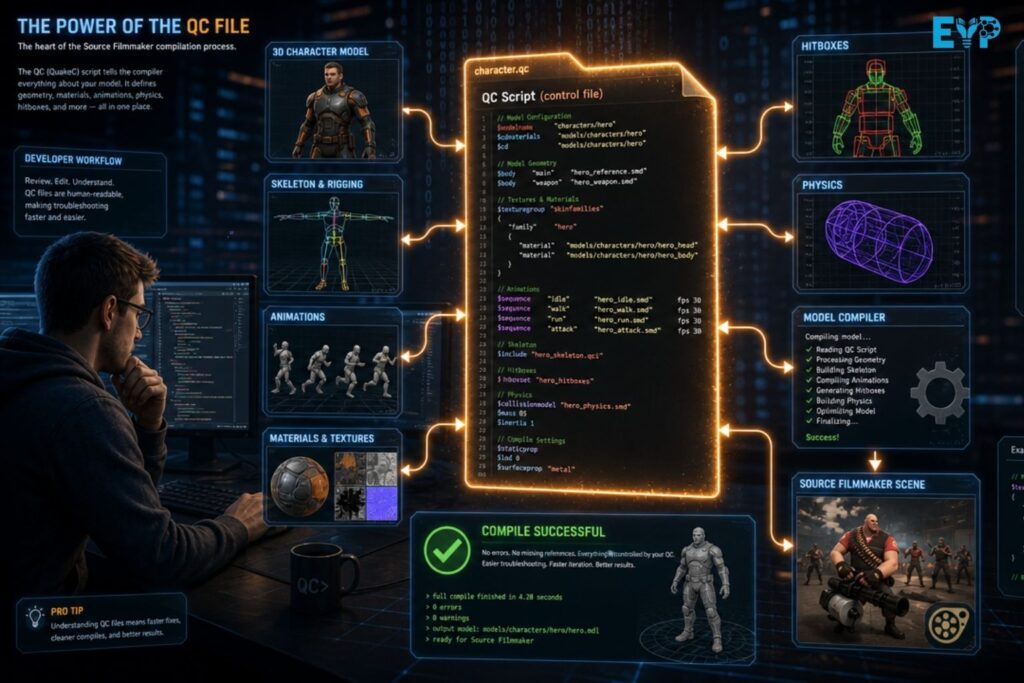
The QC file sits at the center of every successful SFM compile. Although it’s just a text document, it controls nearly every aspect of the compilation process.
Once you become comfortable reading QC scripts, troubleshooting becomes dramatically easier.
The Role of QC Scripts
Instead of storing model data, a QC script acts as a configuration file.
It connects your exported assets with the compiler by defining where files live, which materials should load, how animations are organized, and what the finished model should be called.
Even experienced creators spend a significant amount of time editing QC files because small adjustments often solve large problems.
Essential QC Commands
Some commands appear in almost every QC file.
| QC Command | Purpose |
|---|---|
| $modelname | Sets the compiled model name |
| $body | Defines the primary mesh |
| $cdmaterials | Points to material folders |
| $surfaceprop | Assigns physical surface properties |
| $sequence | Adds animation sequences |
| $collisionmodel | Defines collision geometry |
| $attachment | Creates attachment points |
| $staticprop | Marks static props |
Learning what these commands do gives you much greater control over the final asset.
Common QC Mistakes
Most QC errors aren’t complicated. They’re simply small mistakes with big consequences.
Common examples include incorrect filenames, broken material references, missing quotation marks, invalid directory paths, and animation sequences pointing to nonexistent files.
Whenever possible, edit one section at a time. Small incremental changes make debugging much easier.
Most Common SFM Compile Errors and Their Solutions
Every creator runs into compile errors. The difference between beginners and experienced artists isn’t avoiding them. It’s recognizing them quickly.
Fortunately, many of the most common issues have straightforward fixes.
Missing Texture Errors
If textures refuse to load, the first thing to inspect is the material directory.
Broken file paths, missing VTF textures, or absent VMT materials are usually responsible.
Pink-and-Black Checkerboard Materials
This iconic pattern tells you the engine can’t locate the required texture.
Check the material path, confirm the texture exists, and verify that the VMT references the correct VTF file.
Missing Bones
When exported meshes reference bones that don’t exist in the compiled skeleton, StudioMDL reports missing bone errors.
Re-exporting the model with a consistent bone hierarchy usually resolves the issue.
Invalid Skeleton Structure
An inconsistent skeleton often causes animation failures or completely prevents compilation.
Every exported animation should use the same hierarchy as the reference model.
Too Many Bone Influences
The Source Engine limits how many bones can influence a single vertex.
Cleaning weight painting inside Blender typically fixes this problem.
Cannot Find SMD or DMX File
This error almost always points to an incorrect QC path.
Verify filenames carefully. Even capitalization differences can create problems depending on the workflow.
StudioMDL Failed to Compile
When studiomdl stops unexpectedly, don’t panic.
Read the first error rather than the last one. Later messages often appear because of the original problem rather than representing new issues.
Model Appears Invisible
Invisible models frequently result from export mistakes, incorrect scale settings, reversed normals, or broken material assignments.
Checking the asset inside a model viewer before importing into SFM can save considerable time.
Animation Errors
Animations may fail if the exported skeleton differs from the compiled reference model.
Always keep animation exports synchronized with the original rig.
Incorrect Material Paths
One misplaced folder name is enough to break an entire project.
Maintaining a consistent folder structure throughout development dramatically reduces these errors.
Troubleshooting Compile Logs Like a Pro
Compile logs often intimidate beginners because they’re filled with technical messages. In reality, they’re one of the most useful debugging tools available.
Rather than guessing, let the compiler tell you what’s wrong.
Where Compile Logs Are Located
Crowbar displays compiler output immediately after the build completes.
Reading the log before opening SFM can save significant troubleshooting time.
How to Read Common Error Messages
Focus on the first critical error.
Later warnings frequently cascade from the initial problem. Solving the first issue often eliminates several others automatically.
Which Errors Can Be Safely Ignored
Not every warning indicates a broken model.
Some messages simply highlight optional optimizations or unused data. Learn the difference between warnings and fatal errors before making unnecessary changes.
When Warnings Become Serious Problems
Warnings deserve attention when they involve missing files, invalid skeletons, broken materials, or failed animations.
Ignoring those messages usually creates larger problems later in production.
Organizing Your Project Before Compiling
A clean project is easier to compile, easier to debug, and much easier to maintain.
Good organization becomes increasingly valuable as projects grow.
Recommended Folder Structure
Keep models, textures, animations, materials, and QC files in clearly separated directories.
A predictable directory structure reduces confusion and makes collaboration easier.
Keeping Textures Organized
Store related textures together rather than scattering them across multiple folders.
Consistent organization minimizes broken material references during future updates.
Naming Conventions That Prevent Errors
Use descriptive filenames without unnecessary spaces or special characters.
Simple naming conventions reduce typing mistakes inside QC scripts.
Version Control for Large Projects
If you’re building complex scenes or custom characters, maintain backups.
Version control lets you recover earlier working builds instead of rebuilding projects from scratch after accidental changes.
SFM Compile vs. Model Import vs. Rendering
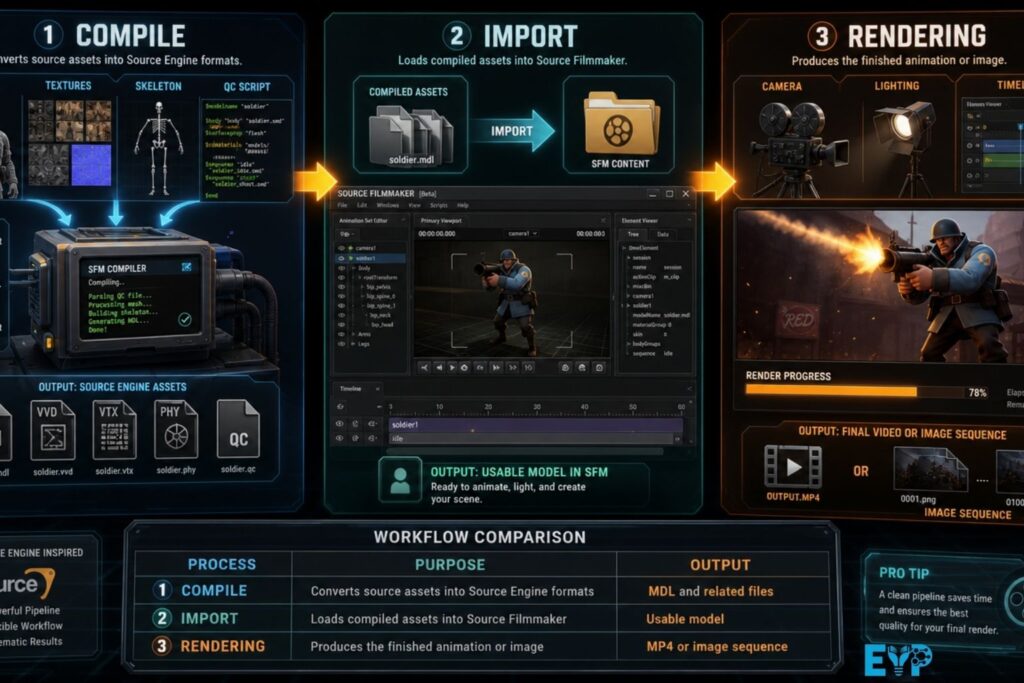
These three processes often get mixed together, yet they perform completely different jobs.
Understanding the distinction makes the overall Source Filmmaker workflow much easier to follow.
| Process | Purpose | Output |
|---|---|---|
| Compile | Converts source assets into Source Engine formats | MDL and related files |
| Import | Loads compiled assets into Source Filmmaker | Usable model |
| Rendering | Produces the finished animation or image | MP4 or image sequence |
Why These Processes Are Often Confused
Compilation prepares the asset.
Importing loads the asset.
Rendering creates the finished video or image.
Each stage depends on the previous one, yet none of them performs the same task.
Best Practices for Faster and Cleaner SFM Compile Workflows
Small habits make a huge difference over time.
Professional creators rarely rely on luck. Instead, they follow repeatable workflows that reduce mistakes before they happen.
Validate Models Before Export
Inspect geometry, normals, and materials before generating export files.
Finding problems early is always faster than fixing compiled assets.
Keep Bone Hierarchies Clean
Avoid unnecessary bones and maintain consistent naming across every animation.
A stable skeleton improves both compilation and animation playback.
Optimize Polygon Counts
High-detail models look impressive, though excessive geometry can hurt rendering performance.
Optimize where possible without sacrificing quality.
Maintain Consistent Scale
Use consistent unit settings throughout your Blender workflow.
Scale problems often affect animations, physics, and collision models.
Test Compiles Frequently
Compile smaller changes instead of waiting until the project is complete.
Frequent testing isolates problems while they’re still easy to identify.
Back Up Working QC Files
A working QC script is valuable.
Keeping backup copies lets you restore stable configurations quickly after experimentation.
Keep Tools Updated
Updated versions of Crowbar, Blender Source Tools, and supporting utilities often include compatibility improvements and bug fixes.
Beginner Mistakes to Avoid
Nearly every creator makes these mistakes at least once.
Knowing about them ahead of time can save hours of frustration.
- Compiling before verifying textures.
- Using incorrect material directories.
- Ignoring compiler warnings.
- Exporting without applying transforms.
- Mixing different project folders.
- Forgetting required output files.
- Using inconsistent skeletons.
- Importing assets before checking compiler logs.
Frequently Asked Questions
Can Source Filmmaker compile FBX files directly?
No. SFM doesn’t read FBX files directly. They must first be exported to formats such as SMD or DMX before compilation.
Do I always need a QC file?
Yes. The compiler relies on the QC file to understand how your assets should be processed.
Is Crowbar required for SFM compile?
Not technically. You can run studiomdl.exe from the command line, but Crowbar provides a much simpler graphical interface.
Why does my model appear as pink and black squares?
That usually indicates missing VTF textures, incorrect VMT materials, or broken material paths.
Why is my compiled model invisible?
Common causes include incorrect scaling, export problems, missing materials, or errors reported during compilation.
What’s the difference between SMD and DMX?
Both are export formats. DMX supports more advanced data, while SMD remains widely used because of its simplicity and compatibility.
Can I compile models from Blender for SFM?
Yes. Many creators build assets in Blender, export them with Blender Source Tools, and compile them using Crowbar and studiomdl.
Does compiling affect render quality?
No. Compilation prepares assets for the Source Engine. Final image quality depends on your scene setup, lighting, camera work, and rendering settings.
Conclusion
Learning SFM compile can feel overwhelming at first because the workflow introduces unfamiliar tools, file formats, and terminology. Once you understand how everything connects, though, the process becomes logical rather than intimidating.
The key is to think of compilation as the bridge between your 3D software and Source Filmmaker. Programs like Blender create the assets, the QC file explains how they should be assembled, and studiomdl converts everything into optimized Source Engine files that SFM can load efficiently.
As you gain experience, you’ll notice that successful projects rely less on memorizing commands and more on following a consistent workflow. Organize your folders, verify exports, read your compiler logs, and test changes often. Those habits will help you solve problems faster and create reliable custom models that work exactly as intended.

Muhammad Bilal is an expert blogger specializing in meanings in text, delivering clear, engaging insights that help readers understand modern language, slang, and digital communication trends.